Modifying the Logic App Azure Workbook: Custom Views for Multi Workflow Monitoring
- Jeff Wessling

- Jun 3, 2025
- 7 min read
Adapting Azure Workbooks to fit enterprise integration needs
This post is part of our Logic Apps Observability series. See Part 1 on enabling Application Insights v2 telemetry, and Part 2 on applying the Logic App Overview Workbook Template.

The out of box Logic App Overview Workbook Template is powerful, but like most templates, it is a starting point. Every organization’s integration landscape is different, and sooner or later you will need to adjust the workbook to fit. Whether it is changing a column format, combining multiple workflows into one view, or extending queries with KQL, the template can be adapted to provide operational clarity at scale.
Insight: Modifying the Workbook
Azure Workbooks are flexible because they rely on Kusto Query Language (KQL) queries against Application Insights data. Even with minimal experience, you can tailor the template:
Add or Adjust Columns: Expose business identifiers or action outputs to make troubleshooting easier.
Multi Workflow Views: Consolidate related workflows into a single dashboard to reduce context switching.
Side Context Pane: Use the right hand pane to surface key information without navigating away.
Formatting and Layout: Adjust colors, labels, and grouping to highlight what matters most for your operations team.
What You’ll See and Why It Matters
When customized, the workbook evolves from a template into a tailored monitoring hub:
Unified Visibility: Multiple workflows displayed side by side in a single dashboard.
Business Context: Key tracked properties exposed directly in views.
Faster Troubleshooting: Support teams drill into errors with less time spent pivoting between logs.
Scalability: Dashboards that grow with the number of workflows under management.
This transforms the workbook into a true operational cockpit, extending beyond Microsoft’s base template.
Apply It
Navigate to the Azure Workbook, and Select the Edit icon

Updating Columns
The first change was pretty straightforward, Azure Workbooks uses KQL to select information from the various tables. I’m not the biggest fan of KQL but once I realized that it’s sort-of like SQL but in reverse it made more sense (FROM, WHERE, SELECT accept that the syntax is [the table], WHERE, PROJECT (and that’s “pro”ject like a projector, not project like "project manager")). So, looking at the “project” lines it was easy enough to see where the base data for the columns was coming from and how they could be rearranged. One thing to note here is that any column that looks like [foo]=[bar] is doing one of two things (creating a column alias, or assigning returned data to an export parameter that can be referenced in other parts of the workbook).

Azure Workbooks offer another way to customize columns using the “Column Settings” button.
Note: This button is only visible if the ‘Run Query’ button has been used to return sample data. If no sample data is returned make sure you have entered values into the Primary and Secondary selectors at the top.

Once the Column Settings button is visible when clicked, it opens a side context pane where you can change the label of the column, how it is rendered, add special formatting, and a number of other things. Some of the changes we ended up making were to add an icon for ‘Cancelled’ state of workflow instances.
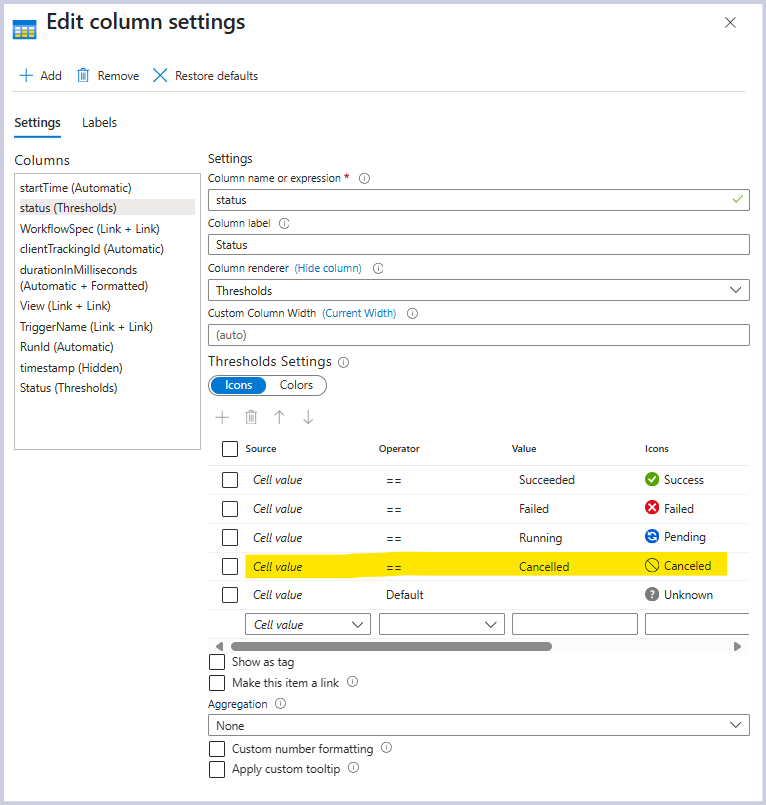
Change the format of various datetime columns.

And rename some column headings to include spaces.

I’m a big fan of having the date as the first column, because I’ll often be looking for the latest workflow instance or someone might report an exception notice at a certain time. We also opted to change the clientTrackingID to something more understandable like ‘Context Id’ so we did that. One thing to understand about the clientTrackingID is that it doesn’t need to be unique. It can be anything and can be repeated in the table (so you can search for all instances of messages with the same cleintTrackingId).
Aggregate Workflow Functionality and View in Side Context
We wanted to add the ability to select and return multiple (or all) workflows.
Adding a multi-select and All option to the Workflow selector
Updating the WHERE clauses in the workbook queries what referenced the WorkflowName variable (there are TODO places this needs to be done)
Creating a secondary WorkflowSpec (for specific) variable to contain the specific workflow name of a run instance. When the selector was a singleton, this duty was fulfilled by WorkflowName variable but once we change that one to contain multiple workflows we need another variable to hold the specific Workflow name for looking up the run instance for troubleshooting.
We must first add multi-select and All option to the Workflow Selector. Edit second row sub-selectors by clicking the pencil icon and clicking the Edit button for the sub-selectors.


Select the checkbox for the WorkflowName parameter and click the “pencil” edit icon. From the Edit Parameter context pane that is opened check the ‘Allow multiple selections’ checkbox.

This will cause an additional ‘Include in the drop down’ list to be populated with other options. Select the bottom one that says ‘All’

Once that is done the selector will allow multiple workflows to be selected or ‘All’. Select ‘All’ and click ‘Save’ at the top of the Edit Parameter screen to save the changes and then the “Done Editing” button. However, now the selector will populate the WorkflowName variable with multiple results making the KQL queries non-functional (WorkflowName = ‘workflow1’,’workflow2’,’workflow3’ isn’t going to work). But don’t panic, we can fix that.
Now we must update the WHERE clauses in the workbook queries that referenced the WorkflowName variable. Looking through the KQL queries you can see where the WorkflowName variable is used. We can update this by simply adding an IN statement and parentheses.
From:

To:

This needs to be updated in 3 places in the ‘Completed Run Details…’ results pane. It also exists in the other queries, but I found that operation_name wasn’t needed there so I simply commented them out.

We have achieved the functionality of viewing multiple workflows at the same time. However, one of the cool features of the workbook is that it lets you jump to the workflow instance to review it. By using of the ‘View’ link in the main results page and the ‘Resubmit’ link, you gain productivity.
We must create a secondary WorkflowSpec (for specific) variable to contain the specific workflow name of a run instance. When the selector was a singleton, this duty was fulfilled by WorkflowName variable, but once we change it to contain multiple workflows, we need another variable to hold the specific Workflow name for looking up the run instance for troubleshooting.
Create the WorkFlowSpec variable. Open the ‘Completed Run Details for…’ results pane and click the ‘Advanced Settings’ tab.

Now locate the ‘export parameters’ setting. It should already be selected, but we need to add the new ‘WorknameSpec’ parameter. Click the ‘Add Parameter’ button.

Define the new parameter with the following details.

This will create a new parameter so that returned information can be exported and used elsewhere in the workbook. In this case we want to capture the ‘specific’ workflow name associated with the workflow instance.
Once we have the parameter defined, we can assign results to it as part of the KQL query by re-clicking the ‘Settings’ tab. Back down in the KQL query find the ‘project’ statement and add “WorkflowSpec=operation_Name”. This will assign the selected workflow instance’s workflow name to the new WorkFlowSpec parameter.

Now we have the specific workflow name we need to update the View link. Click the Column Settings button in the first results pane ‘Completed Run Details for…’

After opening, you can see all the headings of the results pane and how they are displayed. You can rename the columns by clicking the ‘Labels’ tab.


We are most interested in the View heading. If you select that from the left side, we can see that it will be rendered as a link and other settings.

Go ahead and check the ‘Open link in Context pane’ for now. This will make the link open in a side pane while you stay in the Workbook. This will allow you to test and save your work. You can change this behavior later if you want the full view in a page. We will configure the link by clicking the Configure button. It will open a context pane with details about the link.

Replace the “WorkflowName” references with “WorkflowSpec”. There should be 3 instances to replace here. A sample of the JSON to be created may be displayed below, though sometimes it doesn’t, it’s not critical. Once the replacements have been done ‘Save and Close’ the pane. Click all ‘Done Editing’ and ‘Save’ icons to finish this update. Test the new ‘View’ links to see if they get you to the appropriate workflow run (some finessing may be required).
Make the same updates to the Triggername/Resubmit link in the ‘Column Settings’ update the WorkflowName references to WorkflowSpec using the Configure button. There is only one instance in the ARM Action Path for this link.

You should now be able to view multiple workflows at the same time, see their statuses, and navigate to their individual instances for troubleshooting.
There is a lot more you can customize with this Azure Workbook and it seems fairly forgiving. Try things out for yourself and make it even better for your Logic App Standard workflows.
Outcomes: What you Gain
Reduced Support Effort: Less time digging through run histories.
Improved Governance: Standardized monitoring across teams and workflows.
Business Alignment: Dashboards that reflect the data your business users care about.
Adaptability: A template that grows with your integration footprint.
Related Posts in This Series
This article is part of our Logic Apps Observability series. Explore Part 1 on enabling Application Insights v2 telemetry, and Part 2 on applying the Logic App Overview Workbook Template.
Ready to Turn Templates into Tailored Solutions?
Azure Workbooks are only the beginning. Phidiax architects extend and customize them to match enterprise requirements, building dashboards that reduce operational overhead and improve visibility. Let us adapt your monitoring strategy so your teams can support integrations with confidence.

